In This Issue
Channel Board For Cobra 146GTL & Uniden PC-122XL
The Cobra 146GTL and Uniden PC- 122XL are low cost AM/S SB radios using a gPD2824 PLL chip. The
Uniden PC-122XL is the same radio as the PC-122. They changed to the XL series when they went to the
Cobra look front panels. Uniden also made the PRO-810e, a base radio with the same board as the 122.
When this chassis initially came out there was no known way to add extras. This was viewed as just another
challenge for the CB hackers and after a short while there were two methods of expanding coverage.
One uses two crystals that are switched into the tripler coil and this yields 40 extras above and below the
center off position is regular 40, but it created a problem on sideband. This scheme rendered the clarifier
inoperative in the expanded positions. A wire from the clarifier control to the expander kit was added to get
some clarifier range but it was limited and all three modes had three different center slots. These kits also
work on the Cobra 29-GTL and Uniden PC-76. These radios being AM only, work fine and these kits are the
preferred method of expansion.
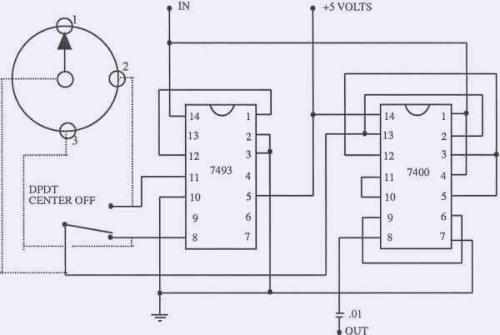
The other kit doesn't use crystals. It uses two ICs that generate a signal for the tripler coil in the PLL circuit.
The clarifier works the same in all positions of the expansion switch. This makes for ease of operation. The
only drawback is the total channel coverage is reduced. It doesn't yield any lower frequencies but it does
make the radio cover up to 28.045 Mhz.
Warning: The modification of the
radio in the U.S. voids the FCC
type acceptance and makes the
equipment illegal!
The installation of the circuit
board is easy. The leads should
be as short as possible. Locate
the PC board as close to the
2824 PLL chip as possible. Either
a SPDT center of toggle switch or
a three position rotary switch can
be used. If you buy a kit, it comes
with the toggle switch mounted to
the PC board. It can be removed
or used to secure the board and
switch in one step.
If you choose to build the PC
board you can use a
multipurpose PC board such as
Radio Shack #276-150 or #276-
159. Position all the components
as close together as possible.
Hand wire all connections using short wires. Mount the board securely and be sure that nothing metallic
comes in contact with it including the speaker on bottom cover.
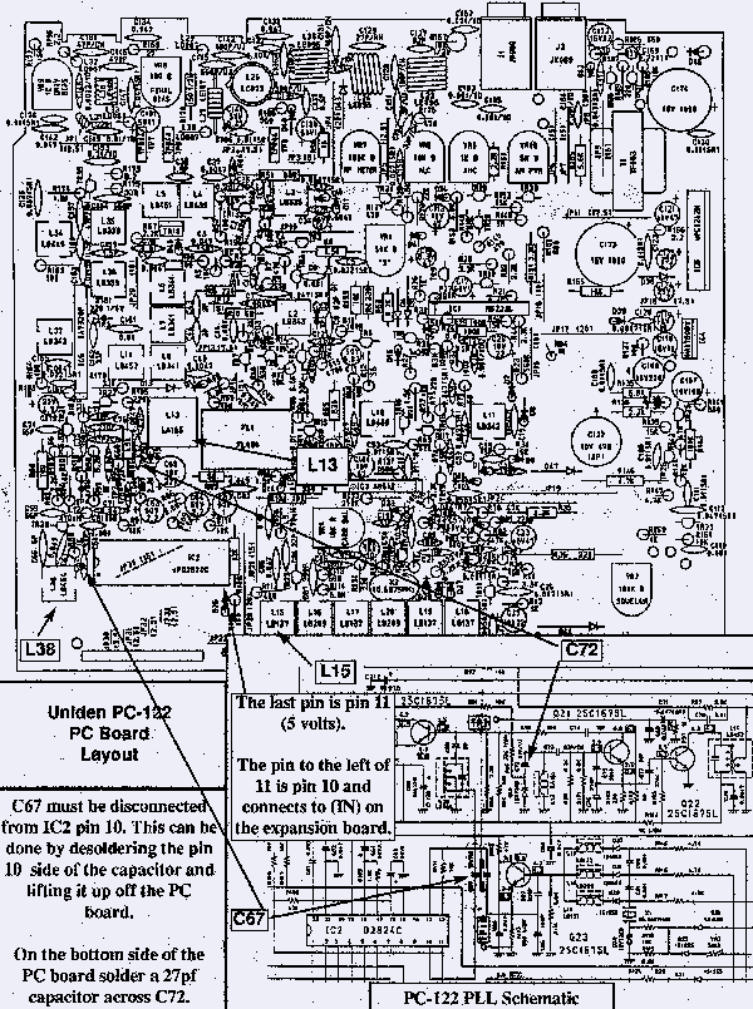
Once the PC board is installed and wired to the switch, four short wires need to be connected to the PLL
circuit. First run a wire from the connection with the ground symbol on the expansion PC board to the can of
L15. Next connect the lifted side of C67 to the (OUT) connection of the expansion board. Connect IC2 pin 10
to the expansion board connection marked (IN). Then connect IC2 pin 11 to the expansion board connection
marked (+5 VOLTS).
To insure complete VCO coverage solder a 27pf capacitor across C72 on the back side of the radio circuit
board. Make sure to lay it down flat and keep the leads short. Then double check your work looking for
solder bridges and correct connections.
CLICK ON PC BOARD LAYOUT FOR MAGNIFIED VIEW.
Next is the alignment procedure. Connect a watt meter, frequency counter and dummy load to the radio.
1) Put the radio in the AM mode on channel 1 with the expansion switch in the normal position and transmit.
You should read 26.965 on the frequency counter. If the radio doesn't transmit, there may be a wiring
mistake somewhere or the VCO may need adjustment. Adding the capacitor across C72 does change the
adjustment slightly, but not usually enough to loss channel 1. If everything looks OK then melt the wax in L38
and adjust it slowly in either direction no more than 3/4 of a turn. You should now transmit on channel 1.
2) Put the expansion switch in one of the upper channel selections. and adjust L13 until you read either
27.285 or 27.605 on the frequency counter.
3) Put the expansion switch in the opposite expanded position and you should read the other frequency
listed above. You should read 27.285 in one position and 27.605 in the other position. If not, tweak L13 a
little until you do.
4) Check to see that you still read 26.965 in the normal position.
5) Switch to the position that yields 27.605 and switch the channel selector to channel 40. The counter
should read 28.045. If it doesn't, melt the wax in L38 and slowly adjust it until you read the 28.045 on your
counter.
6) Go back to normal channel I and insure that you read 26.965 on the counter.
If everything went well you have a radio that goes up to 28.045. Of coarse we know you will only receive
these frequencies and never transmit above 27.405. Remember 28.000 is the beginning of 10 Meters.
I'm told for the Ham operators out there, moving the wire on the expander from pin 8 to pin 9 on the 7493 IC
along with adjusting L13 and L38 will give you coverage in the novice portion.
Well, this article was supplied for information purposes and I hope you enjoyed it. Even if you don't tinker
with radio equipment it's always good to be aware of what's available. Have fun! ©
CBWI


© CB World Informer Network 1996 - 2023 Worldwide Rights Reserved


AUGUST
VOLUME 1
ISSUE 3


- August 1996
- September 1996
- October 1996
- November 1996
- December 1996
- Review Of Midland 79-290 AM/SSB Mobile
- Cobra/Uniden SSB Chassis Mod UPDATE
- Clarifiers
- President Jackson Unlocked Clarifier Mod.
- Cobra 148 & Uniden GrantXL Clarifier Mod.
- Cobra 142GTL & Uniden Washington Clarifier
- Uniden Grant Unlocked Clarifier Mod.
- Uniden PCI22 PRO SSB Clarifier Mod.
- Review Of The Northstar DX880HL
- Big Bust At The Consumer Electronics Show
- Bob's CB Has Opened
- January 1997
- The New Mongoose Model 450 Review
- Wilson Antenna Tests The Trucker 5000
- A Company With Interference Solutions
- Solving Telephone RF Interference
- Lowpass Filters: What, Where, And How
- Using Highpass Filters For TVI
- How To Conduct A Noise Audit
- Modern Do-It-Yourself Grounding Techniques
- Using Water Pipes For RF Grounding
- Using Water Pipes For RF Grounding
- February 1997
- The New Emperor TS-3010 Review
- Bulkhead Grounding
- Grounding Coaxial Cable Shields
- Using Anti-Oxidants
- Modern Lightning Protection - RF Entry Ports
- Modern Lightning Protection - AC Power Lines
- Modern Lightning Protection - Control Lines
- Modern Lightning Arrestors - Polyphaser VS I.C.E.
- Modern Lightning Arrestors - Alpha Delta VS I.C.E.
- Modern Lightning Arrestors - Cushcraft VS I.C.E.


- July 2001
- Galaxy DX 2547 Reveiw
- Inside The DX 2547
- DX 2547 Channel Mod
- DX 2547 Clarifier Mod
- DX 2547 Photos
- DX 2547 Manual Excerpts
- The Anttron Story
- Anttron 305 Revisited
- New Antrron Products
- Aries A-SWR 460 Digital Meter
- Barjan Buys Wilson Antenna
- Wilson Electronic In Cell Phone Market
- First Web Issue
- Help Get The Word Out
- August 2001
- Sneak Preview: The New Maverick A24
- Maverick A24 Front Panel Controls
- Maverick Conversion
- Inside The Magnum Maverick A24
- Barjan Buys Francis Antenna
- Wilson Antenna, 1 Year After Barjan Buyout
- CBer Busted
- Astaic's MobileMax
- Solarcon I-Max 2000
- False Performance Claims
- CAUTION: Don't Burn Out That Radio
- Magnum's Filtered Power Cord
- Dragon Super Heavy Duty SO-239 Stud
- CBWI...Give Us Your Opinion
- September 2001
- Reveiw Of The RCI 2950DX
- RCI 2950DX Image Rejection Modification
- RCI 2950DX Coversion & Clarifier Mods
- RCI 2950DX Photos
- RCI 2950DX Board Component Layout
- RCI 2950DX Adjustment Layout
- RM-9807: Petition To Remove 155 Mile Limit
- Slip-Seat Radio Box
- RF Limited UTB-1 Adjustable Talkback Board
- A Message From The Editor
- October 2001
- November 2001
- December 2001
- January 2002
- February 2002
- July 2002
- June 2014


